
Once you get past the fear of the Y-seam, this is a very simple, very fast block to make. In fact, it will take you longer to pick out and cut the fabric, than it will be to sew it. Let's start with fabric selection. You're going to need 3 different fabrics - 1 solid colored fabric, a coordinating medium print fabric, and 1 light value or low volume fabric. Each piece of fabric should be 4.5" x 8." You will also need a ruler with a 60-degree line on it.
Begin by stacking your 3 fabrics on top of each other, laying them on your cutting mat horizontally (I staggered my fabrics in the photo just so you could see all 3 layers). Position the 60-degree line of your ruler along the bottom of your fabric and cut along the right edge.

Now rotate the strip so that the 60-degree cut that you just made is on the left side like so:

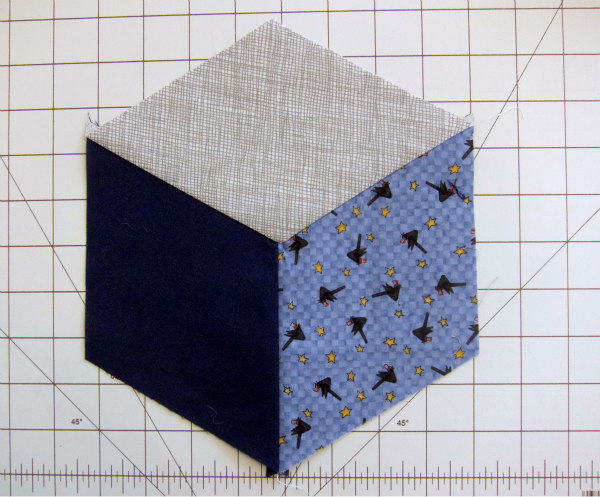
Position your ruler so that the 4.5" ruler mark is along the 60-degree cut that you made. Now cut again on the right side. You should now have 3 diamonds. Lay them out with the solid diamond on the left, the medium print diamond on the right, and the light diamond on the top.

Using a 1/4-inch seam allowance, sew the solid and print diamonds together and press the seam open. I know some people like to press to one side, but for this technique to lay correctly, you really need to press it open, so please indulge me. :)
Once you have the solid and print units sewn together, it's time to sew that 3rd diamond. For most people (okay, maybe it's just me), it's logical to want to place the smaller piece of fabric on top and pin it. For this technique, you need to place the larger, 2-piece unit on top of the single diamond. So place the light diamond underneath the medium print diamond, right sides together and pin on the medium print fabric side. Take special care to place a pin into the middle of the seam as shown below.
 |
| Place a pin directly into the middle of the seam allowance |
 |
| The block from the back - see how the pin lines up with the seam of the other unit and is 1/4 inch from the edge of the light fabric |


Line up your edges, lower your presser foot and finish sewing the seam. This is what the back of your finished block should look like.

Press your block toward the light colored fabric. Not only does it help to reduce bulk, but it also helps give the finished block a bit of a 3-dimensional look to it. Now, step back and admire your work. You've just sewn a Y-seam!

Sweet block and technique. Can't wait to try!
ReplyDelete